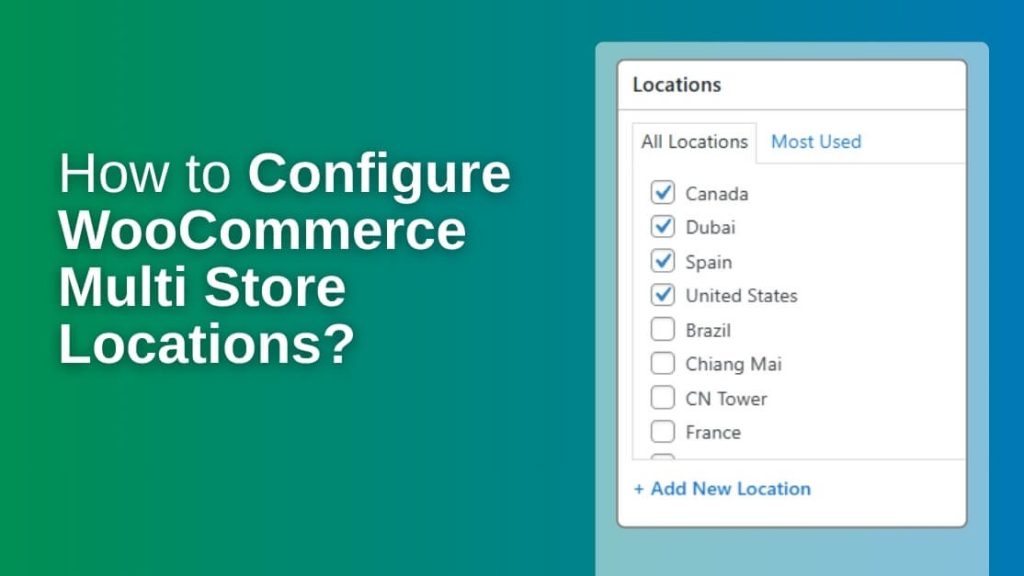
How to Configure WooCommerce Multi Store Locations Step by Step?
Configure WooCommerce multi store locations by installing a multi-location inventory plugin, creating each store location, setting shipping zones, assigning products to locations, and choosing an order assignment method. After saving these settings, your store can manage stock, pricing, and orders across multiple locations.
Still wondering how to configure WooCommerce multi store locations step by step? Read this article to see the full process, common setup mistakes, stock syncing basics, and useful tips that help keep every store location working properly.
Why Businesses Use WooCommerce Multi Store Locations for Inventory Management?
Businesses use WooCommerce multi store locations to manage inventory across several warehouses, branches, or stores from one system. Instead of mixing all stock together, they track products by location, see available units clearly, and keep daily inventory work organized and easier to control.
Multi location tools help businesses manage stock more clearly and avoid confusion. For example, they allow store owners to:
- Track inventory by warehouse or branch
- Fulfill orders from the nearest location
- Manage prices and stock separately for each store easily and clearly
This setup also supports better customer service and smoother operations. Customers can check stock by location or choose pickup from a nearby store. Businesses can assign managers to each branch, review stock reports, and control inventory from one main WooCommerce dashboard.
What You Need Before Configuring WooCommerce Multi Store Locations?
Before setting up WooCommerce multi store locations, prepare a few key things first. These basics help the setup run smoothly. When each part is ready, you avoid errors and save time during configuration and store management later.
- WordPress Installed: A working WordPress site must exist before any WooCommerce setup begins. WordPress acts as the base system where plugins, themes, and store settings are added and managed.
- WooCommerce Installed: WooCommerce should already run on the site. It provides product pages, checkout, payments, and orders. Multi store tools depend on WooCommerce features to manage products across different store locations.
- Products: Make sure you have added all of your products after installing WooCommerce.
- Multi Location Plugin Installed: Install a plugin that supports multiple store locations. This plugin allows you to add several physical stores, manage stock by location, and show nearby stores to customers.
- Store Addresses Ready: Prepare each store address before setup starts. Include street name, city, postal code, and country. Accurate addresses help customers find stores and allow proper location based services.
- Shipping Zones Planned: Plan shipping zones before adding multiple stores. Decide which areas each store serves. Clear shipping zones help control delivery costs, speed, and product availability for customers.
Once these items are ready, setting up WooCommerce multi store locations becomes much easier. Proper preparation saves time, avoids confusion, and helps your store system work smoothly from the start.
How to Configure WooCommerce Multi Store Locations Step by Step?
Before setting up multi store locations, make sure you have already installed WordPress and WooCommerce, and prepared your store addresses and shipping zones.

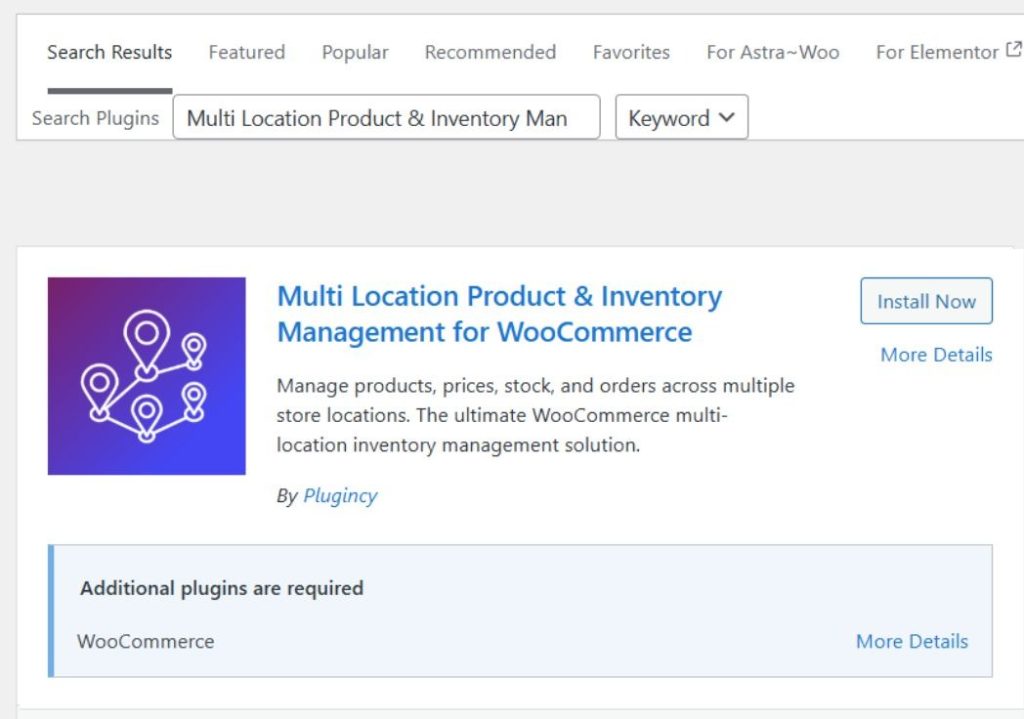
There are many multi store location plugins available in the market, which can make it confusing to choose the right one. For this guide, we will use Multi Location Inventory Management for WooCommerce to set up WooCommerce multi store locations. It is easy to use, does not require coding knowledge, and offers both free and paid versions. You can install the version that matches your needs.
Let’s begin with the installation process.
System Requirements
Before installing the plugin, ensure your server meets these minimum requirements:
| Requirement | Minimum Version |
| WordPress | 5.0 or higher |
| WooCommerce | 4.0 or higher |
| PHP | 7.2 or higher |
| MySQL | 5.6 or higher |
Install the Plugin
You can install the plugin in two ways.
Option 1: Install via WordPress Dashboard
- Log in to your WordPress admin panel.
- Go to Plugins → Add New.
- In the search bar, type Multi Location Product & Inventory Management.
- Find the plugin in the results.
- Click Install Now.
- After installation, click Activate.
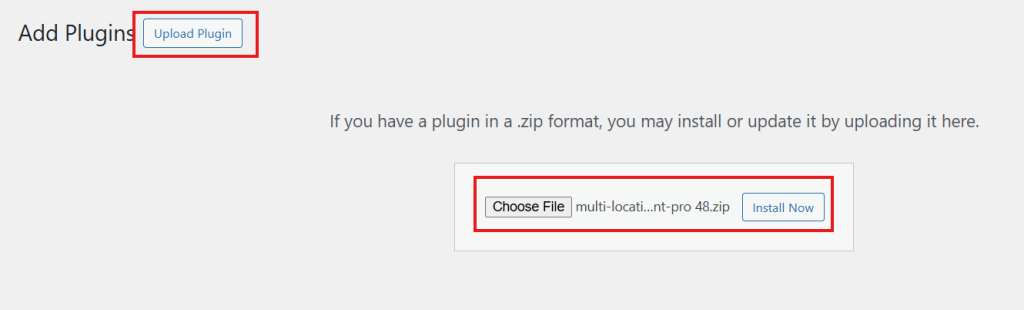
Option 2: Install via Manual Upload
- Download the plugin ZIP file from the WordPress Plugin Directory.
- Go to Plugins → Add New → Upload Plugin.
- Click Choose File, select the ZIP file, and click Install Now.
- After installation, click Activate Plugin.
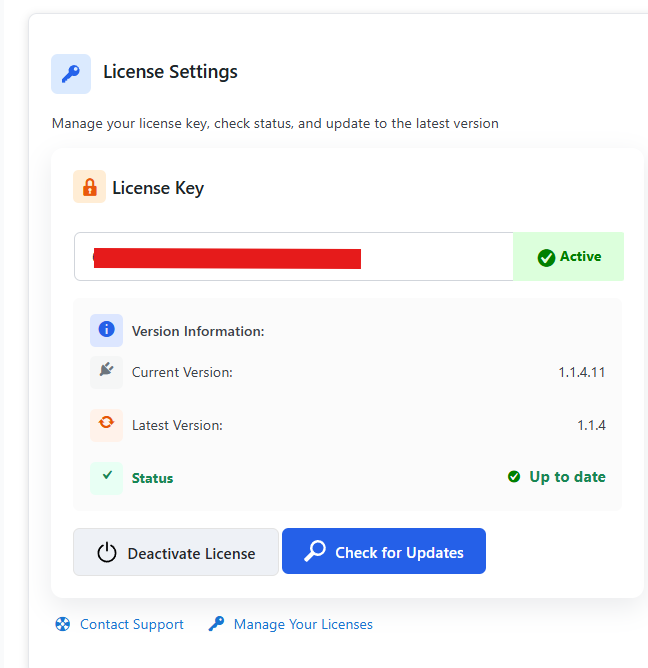
Activate the Pro Version
If you purchased the Pro version, you will receive a license key.
- Go to Location Manage → Settings → Plugin License.
- Paste the license key.
- Activate the plugin to unlock Pro features.
Now the plugin is installed. The next step is creating locations.
Step 1: Create Store Locations and Configure Shipping
After installing and activating the plugin, the first main step is to create your store locations and connect them with shipping zones and other important settings.
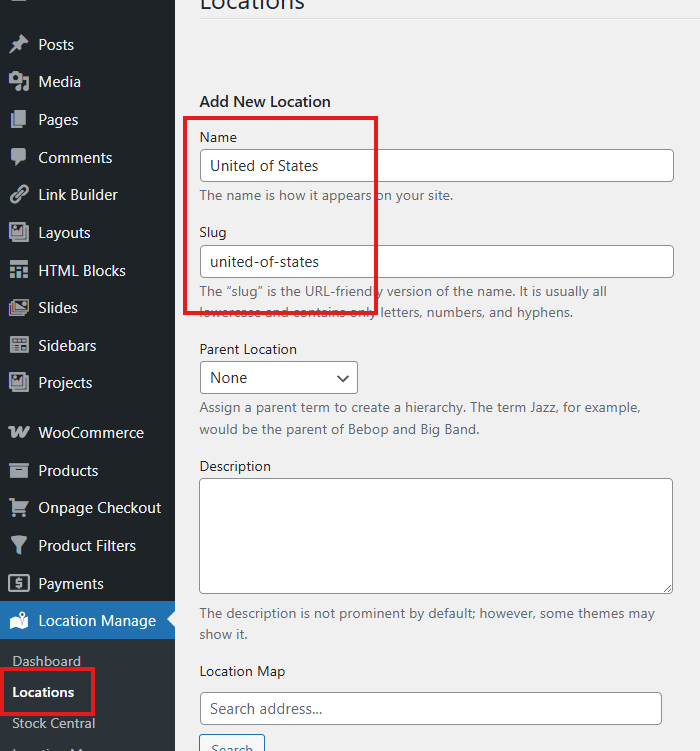
Go to: Location Manage → Locations
Now start filling in your location details.
Basic Location Information
Enter the following:
- Location Name (example: America)
- Slug (example: america)
- Description (optional)
- Parent Location (if needed)
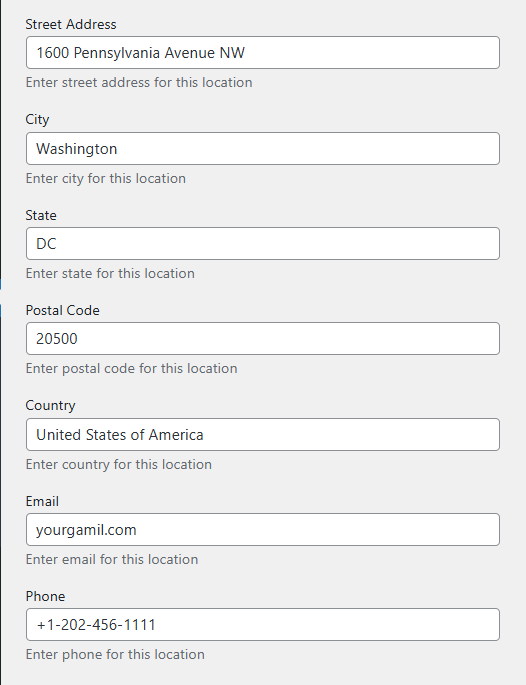
Scroll down, and you will see a map. You can select your store location from the map or search for it. However, it is better to manually enter the full address details to ensure accuracy.
Stock Alert Settings
While creating the location, you can set stock alert limits:
- Low Stock Threshold – example: 5
- Out of Stock Threshold – example: 0
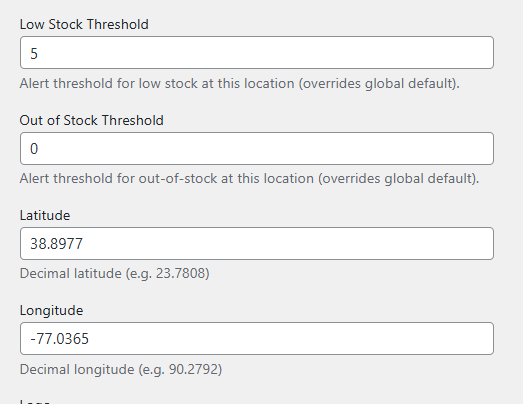
When the stock reaches these numbers, you will receive alerts on your dashboard.
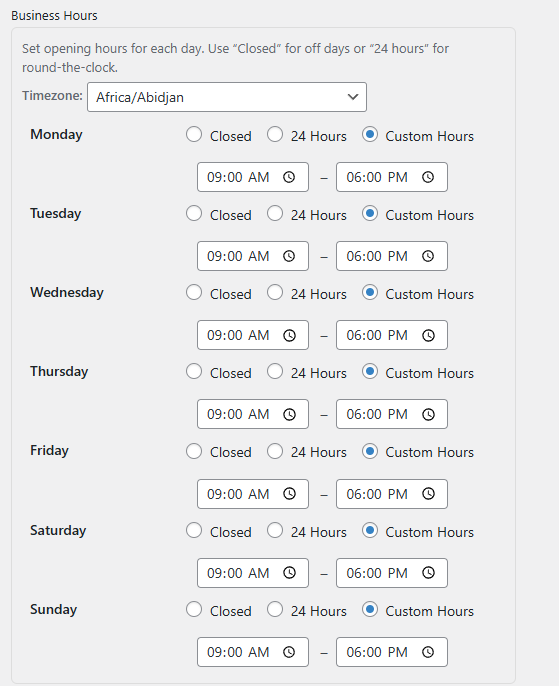
Business Hours (Pro Feature)
Next, configure your store’s working time:
- Select your Time Zone
- Set Opening Time
- Set Closing Time
- You can also define custom hours if needed
Create Shipping Zones (If Not Created Yet). Before assigning shipping zones inside the location, you must create them first.
Go to: WooCommerce → Settings → Shipping
- Click Add Zone
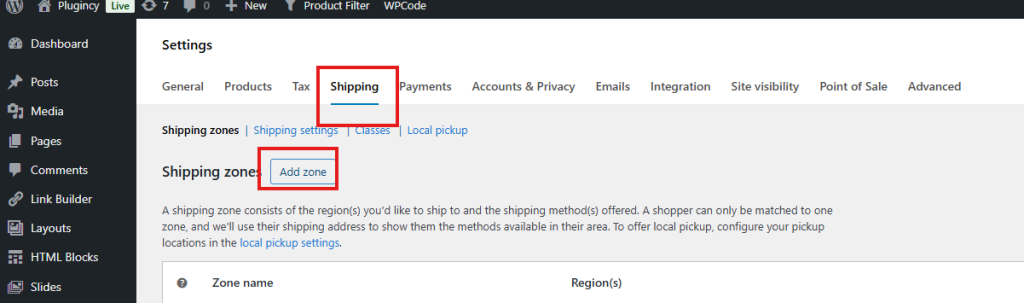
- Enter:
- Zone Name
- Zone Regions
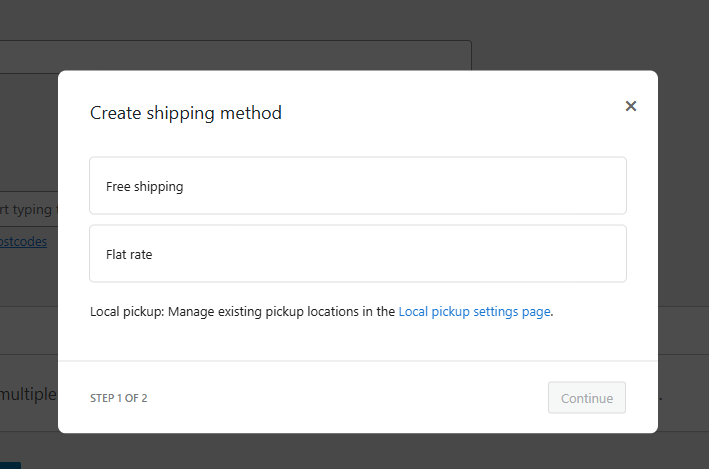
- Click Add Shipping Method
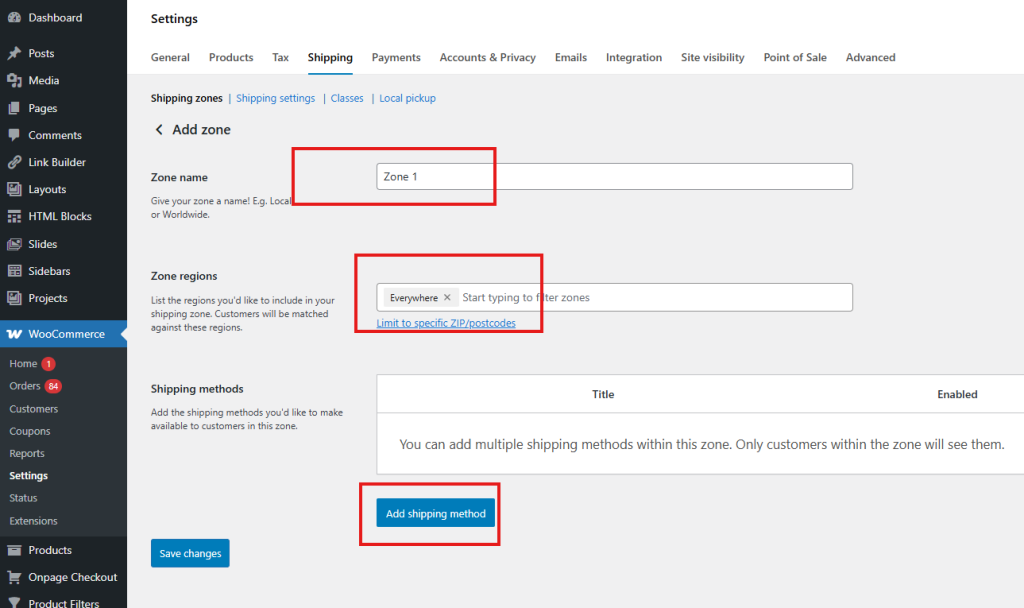
You can choose:
- Free Shipping (set requirements if needed)
- Flat Rate (set your own shipping cost)
Click Save Changes. Now return to your location creation page. Connect Shipping and Payment Settings to Location. Inside the location settings, you can now:
- Select the Shipping Zone
- Choose Shipping Methods
- Set Payment Methods
- Add Pickup Locations

You can also configure:
- Currency (example: USD for America)
- Currency position
- Tax class
- Display order

After completing all these settings, click Add New Location.
Step 2: Assign Locations to Products
Make sure your products are already created.
- Go to Products → All Products.
- Click Edit on a product or create a new one.
- In the Location section, select the location where the product is available.
Next: Go to Product Data → Location Settings. You will see all selected locations listed there. Set for each location:
- Stock status
- Regular price
- Sale price
- Backorder availability
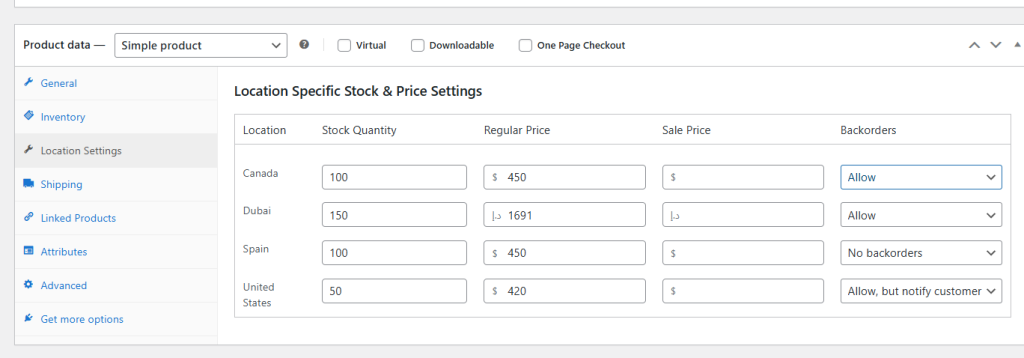
Click Update or Publish. Now your product is assigned to specific locations.
Step 3: Choose Order Assignment Method
The plugin also lets you control how orders are assigned to locations.
Go to: Location Manage → Settings → Order & Cart
You will see four options:
- Customer Selection (Based on selected location): Customers choose their preferred location.
- Inventory Based (Location with highest stock): The system automatically selects the location with the highest stock.
- Proximity Based (Nearest location to shipping address): The plugin selects the nearest location to the customer’s shipping address.
- Manual Assignment (Admin assigns after order): Customers place the order, and the admin manually selects the supply location.
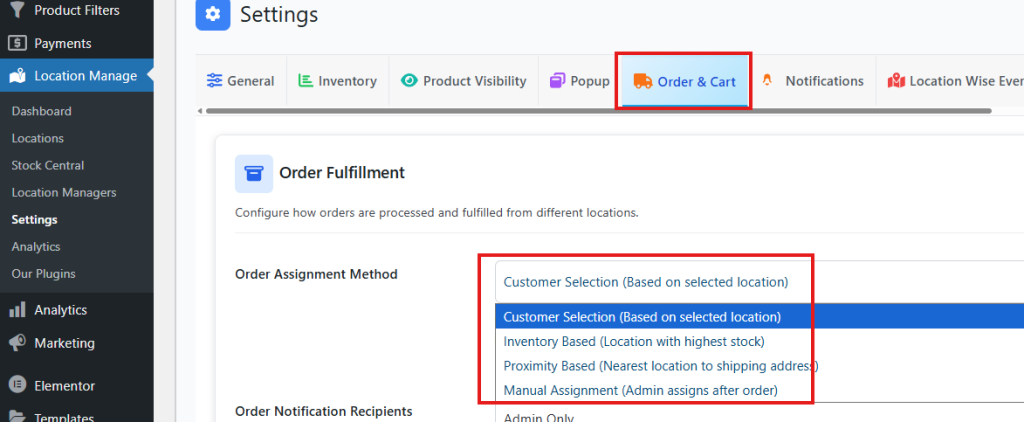
Choose the method that suits your store best and click Save Changes.
Final Setup Complete
You have now successfully configured WooCommerce multi store locations. These are the basic and essential settings required to run a multi-location store smoothly. The plugin also offers additional features that can further improve your store experience and management system.
How WooCommerce Multi Store Locations Sync Stock Across Warehouses?
WooCommerce does not natively manage multiple warehouse stock for one product. By default, WooCommerce tracks one stock quantity per product or variation, so multi-warehouse syncing only happens when you add a multi-inventory or multi-store extension on top of it.
The Mechanism Behind Stock Sync Across Warehouses
1. Each Warehouse or Store is Created as its Own Inventory Location
Multi-location inventory tools first create separate inventory records for each location, such as Warehouse A, Store B, or Regional Hub C. In WooCommerce Multi Inventory Management, inventories can be set up by location, warehouse, store, supplier, or another inventory type.
2. Stock is Stored per Product, per Location
After locations are created, the product is linked to one or more of those locations. Then each location gets its own stock quantity for that same product. So instead of one shared stock number, the system keeps separate numbers like this:
- America Warehouse: 20
- Spain Store: 8
- Argentina Pickup Point: 3
That is why these plugins say you can add stock for each inventory by product and even set location-level SKU or price data.
3. The System Decides Which Location Should Serve the Order
Once location stock exists, the next step is order allocation. This can happen in two common ways:
- Customer-selected location, where the buyer chooses a store or inventory from a dropdown on the product page
- Admin-selected or rule-based location, where the admin assigns the order to the relevant inventory
- Nearest-location logic, where the plugin detects the customer’s location and shows the nearest inventory first
WooCommerce’s multi-inventory extension specifically mentions customer selection, admin-only allocation mode, and nearest-inventory detection. That means stock sync starts with knowing which warehouse the order belongs to.
4. Stock is Reduced Only From the Assigned Warehouse
This is the core mechanism.
When an order is confirmed for a chosen or assigned location, the plugin reduces stock from that location’s quantity, not from every warehouse at once. So if 2 units are sold from Warehouse A, Warehouse A goes down by 2, while the other warehouses stay unchanged.
That is how multi-location stock stays accurate. The system is not really “merging” all warehouses into one stock pool. It is mapping the sale to one inventory source and updating only that source. This is the logical model described by WooCommerce multi-inventory and multi-store tools, which manage stock separately by store or inventory.
5. The Frontend Then Refreshes the Available Stock View
After the stock changes in one warehouse, the store can show updated availability by location. Some tools let customers filter products by location, while others show the nearest store stock or location-based product visibility. So the “sync” is not only a backend update. It also changes what the customer sees on the site after stock is deducted.
6. Central Dashboards Keep all Location Stock Aligned
A big part of the syncing mechanism is central stock control. Multi-inventory tools include a stock listing page, stock history, dashboard totals, and CSV import/export. That lets store owners update inventory from one place and keep warehouse records aligned instead of editing products one by one.
How This Works in a Single WooCommerce Site vs Multiple WooCommerce Stores
Some businesses manage multiple warehouses inside one WooCommerce site, while others run separate WooCommerce stores that sync products, stock, and orders between them. Understanding this difference is important because the setup, tools, and inventory logic are not the same in each case.
Model A: One WooCommerce Site, Many Warehouses
In this setup, one WooCommerce install holds multiple inventory locations. The plugin stores separate stock values for each location inside the same store setup. Order allocation decides which warehouse loses stock. This is the usual meaning of multi-location inventory management.
Model B: Multiple WooCommerce Stores Syncing with Each Other
In this setup, there are separate WooCommerce sites, and a sync extension keeps product data, inventory levels, and orders consistent across connected stores. WooCommerce Products and Orders Sync is built for this kind of store-to-store synchronization.
So if your article is about warehouses, you should mostly explain Model A, not cross-site syncing.
What Actually Triggers the Stock Update?
The stock change usually happens when one of these events occurs:
- An order is placed and tied to a warehouse
- An admin allocates the order to a location
- Stock is edited manually in the central inventory table
- Stock is updated in bulk through CSV import/export
- In multi-store site syncing, an order or product update is pushed between connected stores
WooCommerce’s multi-inventory docs confirm manual editing, bulk import/export, stock history, and admin allocation features, while Products and Orders Sync confirms store-to-store syncing of inventory levels and order details.
Common Problems When Configuring WooCommerce Multi Store Locations
Setting up multiple store locations in WooCommerce can feel confusing at first. Many settings must connect correctly for everything to work well. One small mistake can break location display, shipping, or stock. Below you will see common problems and simple explanations.
Store Locations Not Showing Correctly
Sometimes admins add store locations, but customers cannot see them. This happens when the frontend display settings are incomplete or incorrect. Country code, distance unit, and location rules must be set properly. The Location Product Availability setup controls how stores appear on product pages. Without these settings, the store finder may not display correct results.
Products Not Linked To Store Locations
Adding store locations does not make every product available there. Products often need manual assignment to each location. This is common when using per-product availability rules. Without proper links, customers may see the wrong branches or none at all. Correct product location assignment ensures the right store appears for each product.
Local Pickup Not Showing At Checkout
Local pickup may not appear during checkout for many setups. This usually happens when pickup is missing from shipping zones. WooCommerce requires Local Pickup to be added inside a shipping zone. If a customer’s address does not match that zone, pickup will not appear. Always confirm WooCommerce Local Pickup settings are added properly.
Shipping Zones Ordered Incorrectly
Shipping zones must follow the correct order inside WooCommerce settings. The system matches customers with the first zone that fits. Each customer only matches one shipping zone during checkout. WooCommerce recommends placing smaller zones before larger ones. For example, city zones should appear before state or country zones.
Incorrect Zip Code Or Region Setup
Shipping zones depend on the correct postcode and region settings. Small mistakes can stop pickup or delivery methods from showing. Problems often happen with postcode ranges, spacing, or wildcard entries. WooCommerce troubleshooting guides highlight this common issue. Always check zip ranges carefully when configuring WooCommerce shipping zones.
Shipping Methods Not Enabled In Zone
Sometimes zones are correct, but shipping methods are missing. Each matched zone must contain at least one enabled method. Without this, checkout shows no available shipping options. WooCommerce recommends checking zone matches first. Then confirm that at least one shipping method exists inside that zone.
No Shipping Option Appears
Customers may see a message saying no shipping options exist. This happens when a matched shipping zone contains no methods. Store owners often create zones but forget to add delivery options. Some setups also create exclusion zones without testing them properly. Always review each zone to confirm working shipping methods.
Stock Looks Wrong Across Locations
Inventory issues often come from setup mistakes, not system errors. Multi location stock must be clearly separated by store. Products should link to the correct warehouse or branch. WooCommerce Multi Inventory Management tools help track stock levels, low stock alerts, and inventory summaries across locations.
Fixing these issues often solves most multi store setup problems quickly. WooCommerce systems rely on several connected settings working together. Checking each part step by step prevents many errors. Use these tips to keep your store locations working smoothly.
Tips to Maintain Accurate Stock After Setting Up WooCommerce Multi Store Locations
After setting up WooCommerce multi store locations, keeping stock accurate becomes very important. Inventory spread across several stores needs careful tracking. Small mistakes can create stock mismatch problems. The tips below explain simple ways to keep inventory correct.
- Track Inventory By Location: Each store or warehouse should keep its own stock number. Separate counts show exactly where products exist and reduce confusion when orders ship from different locations.
- Assign Products To Correct Locations: Every product must connect to the right store or warehouse. Clear product location settings prevent wrong availability and stop customers from seeing incorrect stock results.
- Update Stock After New Inventory Arrives: When new items reach a warehouse, update stock numbers immediately. Quick updates prevent wrong inventory counts while orders continue coming from customers.
- Use A Central Inventory Dashboard: Many multi location tools provide a single dashboard. This dashboard helps review total stock, track each store’s quantity, and spot low stock early.
- Enable Low Stock Alerts: WooCommerce allows automatic alerts when stock becomes low. These alerts help store owners reorder products early and prevent overselling.
- Test Order Flow For Each Location: Place test orders using different store locations. This confirms the system reduces stock from the correct warehouse after checkout.
- Use Bulk Inventory Update Tools: Managing many products manually can cause mistakes. Bulk update tools or CSV imports help update many products faster and keep inventory records consistent.
Good stock control keeps your WooCommerce multi store system running smoothly. Clear inventory tracking, quick updates, and regular checks help prevent mistakes and ensure customers always see accurate product availability.
Frequently Asked Questions
Setting up WooCommerce multi store locations can raise many small questions while managing inventory, orders, and store settings. The answers below explain important points that store owners often want to understand before or after configuration. These simple explanations help make the multi store system easier to manage.
How Does WooCommerce Handle Inventory When The Same Product Exists In Multiple Store Locations?
When the same product exists in several store locations, each location keeps its own stock number. This means one warehouse may have 20 items while another store has 5. The system does not mix these numbers together. Instead, it tracks each location separately. When a product is sold from a location, only that location’s stock decreases.
Can WooCommerce Multi Store Locations Show Different Product Availability By City Or Region?
Yes, WooCommerce multi store location systems can show product availability based on location. A customer may see which store has the item nearby. Some plugins allow filtering products by city or store. This helps customers find items faster. It also reduces confusion about where a product is actually available.
How Do Store Managers Control Inventory For Each Branch In WooCommerce Multi Store Locations?
Store managers can control inventory by assigning stock to specific locations. Each store or warehouse has its own inventory settings. Managers can update stock numbers for their branch only. They can also review stock reports for their location. This keeps inventory control clear and organized.
Can WooCommerce Multi Store Locations Support Different Product Prices For Each Store?
Yes, many multi location plugins allow different prices for each store. One location may sell a product at a different price than another location. This can happen due to shipping costs, local demand, or promotions. Store owners can set these prices directly inside the product location settings. Customers then see the price connected to the selected store.
How Do WooCommerce Multi Store Locations Help Manage Local Store Pickup Options?
Multi store location setups make local pickup easier for customers. Each store can offer its own pickup option. Customers can select the nearest store during checkout. The order will then be prepared at that location. This helps reduce delivery time and improves customer convenience.
Final Words
Managing many stores inside one WooCommerce system becomes much easier when every location, product, and shipping rule is set properly. By installing a multi-location plugin, creating store locations, linking shipping zones, assigning products, and choosing an order method, you now understand how to configure WooCommerce multi store locations step by step.
Keep checking stock levels regularly and test orders from different locations to make sure everything works correctly. Update inventory when new products arrive and review shipping zones often. Simple checks like these keep your store organized and customers happy. Best wishes for your growing WooCommerce store.